Showing posts with label Monitor. Show all posts
Showing posts with label Monitor. Show all posts
Monday, March 9, 2009
Bezel
We trimmed down the monitor bezel and acrylic with the Dremel and a razor blade for a more precise fit. After giving the TV a good Windexing, we lined up both pieces, tucked them behind the speaker panel, and drilled 2 screws (bottom left, bottom right) into the 2x2s to keep everything in place.


Friday, March 6, 2009
Tuesday, March 3, 2009
Up and Running! (for the most part)
We finished wiring the CP yesterday. All in all, connections and grounds, it maybe took 3 hours total. Not bad. Here's the orgy of wires that resides under the buttons and joysticks (black is ground, red, the connections):

And hooked it up to the monitor (X-Men vs. Street Fighter):

Going CRT for the monitor can't be beat. It looks like the real deal, and not distorted like it would on an LCD. Here's Rambo:

(Note: "for the most part" means that the Player 3 controls, as well as 4/6 Admin buttons don't work yet. Not sure why; we haven't done any troubleshooting (too busy playing :). Hopefully it's a quick fix.)

And hooked it up to the monitor (X-Men vs. Street Fighter):

Going CRT for the monitor can't be beat. It looks like the real deal, and not distorted like it would on an LCD. Here's Rambo:

(Note: "for the most part" means that the Player 3 controls, as well as 4/6 Admin buttons don't work yet. Not sure why; we haven't done any troubleshooting (too busy playing :). Hopefully it's a quick fix.)
Friday, February 20, 2009
All Together Now...
Monitor in, we placed the bottom of the CP box (along with some stacked MDF for height) under the CP/acrylic to get a feel for the overall size. We were pleased.


Monitor Shelf
It's taking shape. We built and installed the monitor shelf (which fit perfectly, I might add) and put the TV in to get a feel for where we need to put the speaker panel (we have to take it out to paint).
1 piece of MDF
3 2x2s (2 support, one brace in the back so the TV doesn't slide off)
22 screws to hold it up and keep it together


1 piece of MDF
3 2x2s (2 support, one brace in the back so the TV doesn't slide off)
22 screws to hold it up and keep it together


Monday, February 16, 2009
Cheating Death...sort of.
There seem to be two different schools of thought when it comes to discharging a CRT TV. The first (and unfortunately the less popular) is the "it's really not that bad if you're careful" school. The second, and more abundant, is the "this will probably kill you/there is no hope" school. I would like to say I was trying to adhere to the former, but its hard to deny the ubiquity of the latter when looking at the high voltage-conducting copper and steel innards of a piece of electronic equipment that was manufactured a decade ago.
But I digress.
Blame the cold, blame the fact that we did zero work on Saturday, but sometime Sunday afternoon we decided to tackle the TV portion of the project which involved removing the TV from the case and discharging it--removing the remaining voltage stored in the cathode ray tube so it is safe to handle (the shock from a still-charged tube can kill you). There are plenty of resources out there on how and why (to prevent your ceasing to be) to discharge a TV. We read most of them and were sufficiently scared, to say the least. While being fairly knowledgeable about computers and gadgets in general, the two of us have a combined electronics (read: volts, watts, amps, circuit boards and copper wire) knowledge of a whopping zero. That being said, if you are trying to do this yourself, do not use this post as a guide. We are not professionals, we are hobbyists. There are people with similar sites that do not post how to discharge a TV for liability reasons, but the information is out there, and you won't have much of a case if you try to sue us. Also, we had a different experience from others discharging a TV, and this is just to add to the knowledge base about the topic.
Here is what we did:
1.) Removed the back casing (our JVC had 6 screws).

2.) Performed the discharge (pardon the language, I was scared).
CRT Discharge 1 from Dan Price on Vimeo.
As you can see, our TV was no longer holding a charge. It had been unplugged for a few weeks, and in some TVs (not all) this is enough to drain the remaining voltage in the tube. Some TVs can hold electricity for years, even if unplugged. I was much more comfortable moving the TV around once we had done this step.
3.) We did it again (and again) to be sure.
CRT Discharge 2 from Dan Price on Vimeo.
4.) Removed the front casing (4 bolts, unplugged front control board).

5.) Attacked the front casing with the reciprocating saw. (Note: this is the best and worst tool ever invented. It will cut the crap out of stuff, just not very gracefully. This is not a precision tool. This is a "I don't really care what this looks like" tool. And since this will all be covered by the bezel...we don't really care what this looks like.) The point of this is so the bezel will fit flush to the glass.


6.) Put everything back together (with the help of some gaff tape).

We decided to keep the TV in its case for a few reasons: First, because we could. It fits perfectly inside of the cabinet (within 1/8 of an inch). Second, because it is safer. The TV will regain its charge once it is plugged in, and we don't want the insides exposed if we have to go in the back and do some work. Third, it eliminates the need for us to build a frame for the TV so it will stand up. We will place the TV on the shelf (once it is installed) and hold it in place with some 2x2 braces.
That's it! Monitor work = done (the scary stuff at least). It is a big weight off of our shoulders.
But I digress.
Blame the cold, blame the fact that we did zero work on Saturday, but sometime Sunday afternoon we decided to tackle the TV portion of the project which involved removing the TV from the case and discharging it--removing the remaining voltage stored in the cathode ray tube so it is safe to handle (the shock from a still-charged tube can kill you). There are plenty of resources out there on how and why (to prevent your ceasing to be) to discharge a TV. We read most of them and were sufficiently scared, to say the least. While being fairly knowledgeable about computers and gadgets in general, the two of us have a combined electronics (read: volts, watts, amps, circuit boards and copper wire) knowledge of a whopping zero. That being said, if you are trying to do this yourself, do not use this post as a guide. We are not professionals, we are hobbyists. There are people with similar sites that do not post how to discharge a TV for liability reasons, but the information is out there, and you won't have much of a case if you try to sue us. Also, we had a different experience from others discharging a TV, and this is just to add to the knowledge base about the topic.
Here is what we did:
1.) Removed the back casing (our JVC had 6 screws).

2.) Performed the discharge (pardon the language, I was scared).
CRT Discharge 1 from Dan Price on Vimeo.
As you can see, our TV was no longer holding a charge. It had been unplugged for a few weeks, and in some TVs (not all) this is enough to drain the remaining voltage in the tube. Some TVs can hold electricity for years, even if unplugged. I was much more comfortable moving the TV around once we had done this step.
3.) We did it again (and again) to be sure.
CRT Discharge 2 from Dan Price on Vimeo.
4.) Removed the front casing (4 bolts, unplugged front control board).

5.) Attacked the front casing with the reciprocating saw. (Note: this is the best and worst tool ever invented. It will cut the crap out of stuff, just not very gracefully. This is not a precision tool. This is a "I don't really care what this looks like" tool. And since this will all be covered by the bezel...we don't really care what this looks like.) The point of this is so the bezel will fit flush to the glass.


6.) Put everything back together (with the help of some gaff tape).

We decided to keep the TV in its case for a few reasons: First, because we could. It fits perfectly inside of the cabinet (within 1/8 of an inch). Second, because it is safer. The TV will regain its charge once it is plugged in, and we don't want the insides exposed if we have to go in the back and do some work. Third, it eliminates the need for us to build a frame for the TV so it will stand up. We will place the TV on the shelf (once it is installed) and hold it in place with some 2x2 braces.
That's it! Monitor work = done (the scary stuff at least). It is a big weight off of our shoulders.
Tuesday, February 10, 2009
State of the Union

Dan had a pretty epic post yesterday, but I wanted to throw a few pictures in, give an update on the progress thus far, and detail where we go from here. The only new addition since the weekend is the picture above: the light for the marquee. (Edit: Sorry again for the crap formatting, I can't get the two pictures below to resize.)
Control Panel:
- We've mentioned before that we're working with acrylic as the CP overlay, and it's extremely difficult. We almost broke a whole sheet trying to cut it the first time and I think both of us got a little frustrated. Well, after all the building on Sunday, we tried a different approach and it worked perfectly. We clamped the entire piece in between two pieces of MDF, except for the portion that was being cut off. After scoring it about 10-12 times a side, we simply hit the exposed part with a hammer and it came right off.
- With that victory in our pocket, we decided to go for broke and start drilling holes. Using the same setup (acrylic in between two pieces of MDF), we starting cutting holes with a 1 1/8" boring bit. The fear here was that we would crack the acrylic, but after four holes, it looks pretty good. We still have another 37 to go, so we're not out of the woods yet, but it's a good start. (Cut some arcylic once, the sound and smell are interesting...)
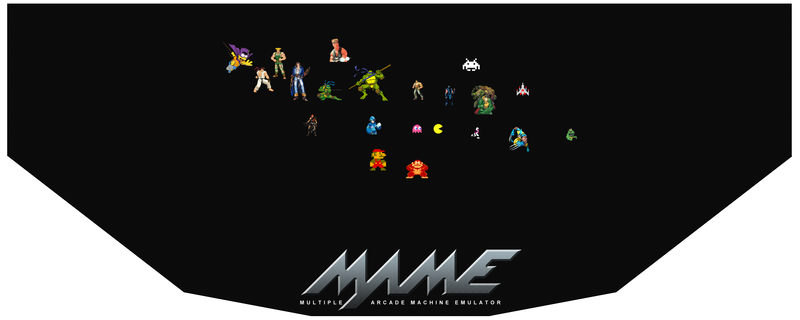
- Dan has been working on the CP graphic, and it looks great thus far. We decided to go with an amalgam of classic game characters and arrange them. The version below is very low res and just a mock up with the images cut out and randomly placed; they will be resized and arranged in the final product. (Edit: direct link to the CP mock.)
Sound:
- I'm hoping to pick up speakers in the next couple of days so we can go ahead and cut our speaker panel and get them mounted along with speaker grills. (Just not THESE speaker grills.)
Cabinet:
- I think we'll start painting sooner than we think. We're probably using a couple of coats of primer and then black satin paint.
- Ordering T-molding this week and I'm guessing we're just going to rent a router from Home Depot to make the cuts.
- The marquee has been planned and making the graphic shouldn't be a problem.
- We're still in the process of planning an efficient power on/off system.
TV:
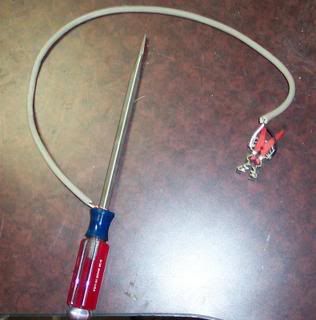
- This is our last big hurdle I feel like, and something that we still can't mess around with. We're almost certainly going to take the tv out of it's case, but that's as much as we can plan for right now. Once we get it out, we'll be able to see our options for mounting it. To ensure that we don't kill ourselves, we did make a nice little tool similar to this: (Edit: direct link to the discharge tool.)
Software:
- I still have a little bit of work to do in terms of the front end, but for the actual emulator is nearly 100% ready to go.
- I still need to program the interface, but I can't do that until we wire the CP.
Saturday, January 24, 2009
Let the Madness Begin
 Alex nerding out with two computers and three monitors working on the software. The TV we acquired seems to be perfect for a MAME, the key specs being 27" w/an S-Video in, and the ability to turn back on to the same input after being unplugged. Now let's just hope we don't kill ourselves taking off the case and discharging it with a screwdriver. Gulp.
Thursday, September 11, 2008
Up and Running
This is going to be a series of posts detailing the construction of our MAME machine. Don't expect it to be updated too often because extra capital and time will be hard to come by at first. I wanted to do this because there are so many resources online that have been invaluable in the planning process for this project. More or less, I want to give back to that community.
I'll add some of the links I found most helpful to the right.

Right now, we're in software and procurement mode. Above is a picture of the computer we'll be using. It's my old tower and houses a 1.8ghz P4, 768mb of RAM, and a 6 series 256mb nVidia card - tested the svideo out this morning and it looks horrible on a hig def screen at a high resolution. Inside the MAME program, however, it looks great - I'm excited to see how it looks on this:

That's the monitor we're using. A simple 27 inch tv with an svideo input. Still haven't completely decided if we'll have to take the case off, but it doesn't look like it.
Currently downloading a huge file (18gb) of games and other utilities. The next post will more than likely come when that's finished.
I'll add some of the links I found most helpful to the right.

Right now, we're in software and procurement mode. Above is a picture of the computer we'll be using. It's my old tower and houses a 1.8ghz P4, 768mb of RAM, and a 6 series 256mb nVidia card - tested the svideo out this morning and it looks horrible on a hig def screen at a high resolution. Inside the MAME program, however, it looks great - I'm excited to see how it looks on this:

That's the monitor we're using. A simple 27 inch tv with an svideo input. Still haven't completely decided if we'll have to take the case off, but it doesn't look like it.
Currently downloading a huge file (18gb) of games and other utilities. The next post will more than likely come when that's finished.
Subscribe to:
Posts (Atom)